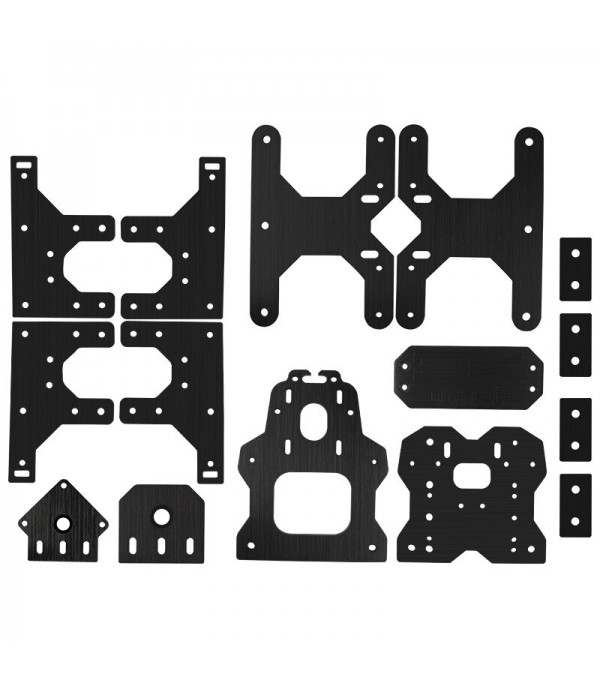
OX CNC Aluminum Gantry Plates Kit--17 PIECES

  • 4,000.00EGP
    • Ex Tax:4,000.00EGP
    • Product Code: OX CNC Aluminum Gantry Plates Kit--17 PIECES
    • Availability: In Stock
    Openbuilds OX CNC Plates Kit Aluminum Gantry Plates 17 Pieces Version for OX CNC Engraving Machine Nema23 Stepper Motor PlateOX CNC Aluminum Gantry Plate Set - 17PCS Version The plate designs used on our hobby CNC machine are based on the originals by Mark Carew. It has added touches to increase the..

    Openbuilds OX CNC Plates Kit Aluminum Gantry Plates 17 Pieces Version for OX CNC Engraving Machine Nema23 Stepper Motor Plate


    OX CNC Aluminum Gantry Plate Set - 17PCS Version


    The plate designs used on our hobby CNC machine are based on the originals by Mark Carew. It has added touches to increase the performance and design of the machine. On the Y-Axis added an inner wheel brace, which reduces the movement of the wheels, and also helps to shield the wheels from cutting debris.

    Plates have also been added or modified to completely cover any bare extrusion ends.
    All the plates supplied with the kit are manufactured from 6082 Aluminium.
    The plates are then shot blast and anodized in matt black, to give a very clean finish.

    Item name:
    OX CNC Aluminum Gantry Plates Kit
    Material: 6061-T5 Aluminium
    Surface: Black Anodized, wire drawing


    • Assemble all the Solid V Wheels as per the drawing.
    • It can help to use one of the longer screws to align everything by threading the parts one by one.
    ItemDescriptionSKUQuantity
    1Solid V WheelsWHEEL-SOLIDV1
    2Ball Bearing 625 2RSBEAR-6252RS2
    3Precision Shim - 10X5X1SHIM-PREC-10511

    Click to expand

    Step 1 Assemble the Solid V Wheel as per the drawing. Ensure you only use 1 Precision Shim between the two 6252RS Bearings

    Step 2 Repeat this for 28 Solid V Wheels

    • At this step, the Y Gantry will be assembled. Please note that the Y-Axis Gantry Plate has 7 holes for 7 M5x30mm Screws and the holes placed on the lower part of the plate. those lower holes are to be used with Eccentric Spacers – 8mm Hex – 6mm Height. These Eccentric Spacers make it possible to adjust the pressure between wheels and V-Slot.
    • All quantities are for both sides of the Y-axis.
    • Precision Shims are encountered in the wheel kit.
    ItemDescriptionSKUQuantity
    1Y-Axis Gantry PlatePLATES-OX-SET-V042
    26mm Metric Aluminium SpacerSHIM-SPAC-6MM8
    3Precision Shim – 10x5x1mmSHIM-PREC-105114
    4Solid V Wheel KitWHEEL-SOLIDV-KIT14
    5M5 Nylon Insert Hex LocknutHARD-NUT-LOCK-5MM14
    6Eccentric Spacers – 8mm Hex – 6mm HeightSHIM-ECCENTRIC-8-66
    7M5X30 Low Profile ScrewsSCREWS-M5-LP-3014

    Click to expand

    Step 3 Insert the M5x30mm screws into the Y-Axis Gantry Plate and layer the hardware as per the drawing above.

    Step 4 Repeat this process for the other Y-Plate.

    • This section will cover the spring-loaded system for the motor. This system was designed to keep the right tension between the rack and the pinion.
    ItemDescriptionSKUQuantity
    1M5 Nylon Insert Hex LocknutHARD-NUT-LOCK-5MM6
    2Universal L Brackets – SingleBRAC-L14
    3Precision Shim – 10x5x1mmSHIM-PREC-10514
    4Plate Motor Nema 23PLATE-MOTOR-RACK2
    53mm Metric Aluminium SpacerSHIM-SPAC-3MM4
    6M5X25 Low Profile ScrewsSCREWS-M5-LP-252
    7M5X20 Low Profile ScrewsSCREWS-M5-LP-202
    8M5X27 Low Profile Screws (M5x30mm in the USA)SCREWS-M5-LP-27 / 302
    910mm Metric Aluminium SpacerSHIM-SPAC-10MM2

    Click to expand

    Step 5 Start placing the M5x25mm and M5x27 screws on the Y-Plate and built it up as per the following image.

    • IMPORTANT The right amount of tightening in the M5 Nylon Insert Hex Locknut and M5x25mm Screw is when the motor plate became hard enough to be hand turned. This means that this nut should not be over-tight or under tight. Before tightening this part, ensure that you place the motor plate quite close to its final position.
    ItemDescriptionSKUQuantity
    1M5 Nylon Insert Hex LocknutHARD-NUT-LOCK-5MM2
    2Spring – 1.2 x 7.5 x 20mmSpring – 1.2 x 7.5 x 20mm2
    3M5X55 / M5X35 Low Profile ScrewsSCREWS-M5-LP-55/SCREWS-M5-LP-352

    Click to expand

    Step 6 Assemble the spring-loaded mechanism as per the image.

    That is what you should have achieved so far.

    Click to expand

    • This section will show how to attach the pinion and motor to the Y-Axis Gantry.


    ItemDescriptionSKUQuantity
    1M5X12 Low Profile Screws (Button Head in the USA)SCREWS-M5-LP-128
    2Nema 23 Stepper MotorELEC-NEMA232
    3Module 1.0 Pinion GearGEAR-M1-32T/GEAR-M1-16T2

    Click to expand

    Step 7 Slightly tight the pinion to the shaft of the motor.

    Step 8 Tight the motor on the plate using the 4 x 12mm M5 Low Profile Screws.

    Step 9 Adjust the centre of the pinion to match the centre of the Wheels and tight the pinion using the long side of your Allen-Key.

    • Please Note That it might be hard to find a spot to reach the screw with your Allen-Key. If this happens, you tight as much as you can with the pinion in the right position, undo Step 10, tight the pinion and attach the motor back accordingly to the previous drawing.

    Please compare your assemble against the following drawing of Y-Axis right side

    Please compare your assemble against the following drawing of Y-Axis left side

    • At this stage, you should be ready to start the X/Z gantry which will be covered in this chapter.
    ItemDescriptionSKUQuantity
    1OX Z Plate FrontPLATES-OX-SET-V041
    2Plate SpacerPLATE-SPACER2
    310MM M5 Low Profile ScrewsSCREWS-M5-LP-104

    Click to expand


    Step 10 Attach the spacer blocks by lining up the spacer blocks with the bottom of the OX Z Flate Front

    Step 11 Insert the 10mm screws into the smaller holes on the plate and the threaded holes in the spacer, the larger holes will line up with the between the spacers and the plate for the wheels in the next step.

    ItemDescriptionSKUQuantity
    1OX Z Plate FrontPLATES-OX-SET-V041
    2Eccentric Spacer – 8mm Hex – 6mmSHIM-ECCENTRIC-8-63
    3Metric Aluminum Spacers – 6mmSHIM-SPAC-6MM3
    4Precision Shim - 10X5X1SHIM-PREC-10516
    5Solid V WheelWHEEL-SOLIDV6
    65MM Nylon Insert LocknutHARD-NUT-LOCK-5MM6
    7Spacer Block (V-slot)PLATE-SPACER2
    845MM M5 Low Profile ScrewsSCREWS-M5-LP-456

    Click to expand

    Step 12 Using 3 x 45mm M5 Low Profile Screws screws attach the V-Wheels through the Gantry Plate and the Spacer Block (V-Slot).

    Step 13 Use 3 x Eccentric Spacer - 8mm Hex - 6mm Height on one Spacer Block (V-Slot) and 3 x Metric Aluminum Spacers 6mm on the other.

    ItemDescriptionSKU

    Write a review

    Please login or register to review